
 Online Poker at Full Tilt Poker Play poker at the only online poker room designed by the world’s best players. |
 |
Thursday, April 29, 2004
My Poker Table Is Finished
I finally finished building my poker table!! Actually, I finished it this past Sunday, but have been waiting to post about it because I wanted to upload some pictures of it, and I had minor technical difficulties with my digital camera. But finally, here's a couple pictures:


What the heck, here's one more:

I had previously detailed the building of this puppy in this post, where I discussed buying he materials from casinosupply.com, and this post, where I discussed my concerns about the "perfect padded rail." On Sunday I ended up going over to a fabric store and buying some maroon vinyl (kinda reminded me of the color scheme at Binion's or the Barbary Coast) to cover up the padded rail that smelled unpleasantly like rubber. Perhaps that was the manufacturer's intention all along, that one would cover up the rubber? It didn't say anything to that effect on the website, and they did call it "perfect padded rail," so I assumed it was all I would need. Oh well.
Anyway, after cutting my spruce plywood into a 4'x6' oval (borrowed a friend's power saw), I did a little stencil-and-spray-paint job on what would become the underside of the table (just quickly spray-painted on an ace of hearts and an ace of clubs), so it would look just a little cooler sitting sideways in the back of our apartment when we're not using it.

The next steps were pretty easy -- I screwed on the folding table legs, along with a few door handles (6 of them) to make it easier to lift the table and turn it over. Then I attached the table foam using spray glue, folded it over the sides and staple-gunned it in underneath. Then I put on the felt, this time just staple-gunning it underneath.
Installing the Padded Rail
The padded rail was the toughest part. This stuff's hard to describe -- here's a picture -- essentially it's a hollow rubber tube with a slit in it, so that a cross-section of it looks like a "C." So first I cut the vinyl into long foot-wide strips and stapled the strips length-wise into the upper-inside of the "C." Then I put the 17' of rubber tubing onto the table, and fastened it using a mix of staple-gunning underneath and hammering a few nails right into the side of the "C" so that it went:
nail --> C --> edge of poker table
being very careful to keep the nails straight so they went into the plywood and not up through my precious felt. This was definitely the hardest part. By the way, the casinosupply.com website says that the padded rail can be attached using 3/4" staples. I didn't see anything bigger than 9/16" at Home Depot, but I didn't actually ask. Finally I took the vinyl and wrapped it around the rubber padding so it was nice and snug, and staple-gunned it to the bottom of the table. (I used almost an entire box of staples on this project.)
After that I just sprayed on some Scotch Guard. I think this caused some very faint discoloration on the felt, although my wife B thinks I'm just seeing things. Consider yourself warned.
Hmmm . . . I'm rereading this and worrying that my description is just detailed enough to be boring but not really detailed enough to be helpful. If you're thinking of working with that padded rail and have a question, feel free to drop me an e-mail.
------
This Sunday's my birthday, and on Saturday B and I are going to host all-day gaming to break this beauty in. Gonna break out some board games during the afternoon, then switch to poker after dinner. I've got 2 different buddies (and poker regulars) who are moving down to D.C. in the next few weeks, so this poker night will be the last time all the poker regulars of the past two years will be together. And for my 2 buds, my last chance to take their money!
Update, May 3
The railing ended up being a little too lose on the table. I think what happened was that when I stored the table, it rests on the side -- this compressed the rubber on one side and mae it "push out" so that it was quite loose on the two curved areas of that site. It "pushed out" so much that it pushed out the nails that were holding the rail in in those two curved areas.
I have remedied the problem by removing all the staples and nails I used to attach the rail, and then making the rail as tight as I could on the table. I ended up cutting off about 6 more inches, that's how loose it was.
I replaced the nails with with screws (#6 x 1.25" screws, to be exact). Instead of washers on the screws, I used 10 2" mending plates. These are just little 2" pieces of metal with two holes in them (they're kept in the door hinges area at Home Depot). Basically the two screws and the mending plate, all together, act as one big staple for the rail.
I put the mending plates directly onto the rubber rail, then pulled the vinyl back over it and restapled the vinyl to the bottom of the table.
The rail is now very tightly affixed to the table, and hopefully this'll be the last bit of repair that I need to do.
Update, June 6
Here's a couple pictures of a small cross-section of the padded rail, with the vinyl stapled to the inside of the "C":
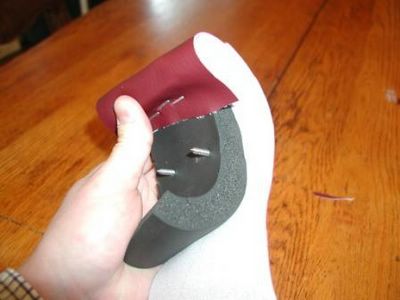
And here's another picture of that cross-section from the side. You can see the two screws on the inside of the 'C":

The loose vinyl on the "under" side of the "C" gets stapled to the bottom of the table.
Also I received a question about how to deal with the fact that the padded rail was just under 17 feet long, while the vinyl I had was 6 feet long. Answer: I used 3 strips of vinyl. Here is another picture, showing how I folded the vinyl over where two strips met:

Finally, a reader mentioned to me that one might be able to purchase rubber pipe insulation instead of buying the perfect padded rail from casinosupply.com -- for all I know, that may be what casinosupply.com is really selling. My table's done so I'm not going to Home Depot to investigate, but anybody about to build a table may want to look into this less expensive possibility.
Hope this helps!
posted by James at 11:00 PM
